UE4 Sample Application
This section explains the UE4 Cube Sample application and how to use the Genvid Plugin and Module.
- Origin
- Content
- C++ Classes
- Blueprint Game Classes
- Blueprint Genvid Classes
- Blueprint Structures
- Assets
- How to run the Cube sample
- Genvid integration
- Instantiation
See Start a Local Cluster for more information about running the Cube sample.
Note
Please make sure you use a version between 4.15.3 and 4.27 when running this sample.
Origin
The Cube sample uses the Unreal Engine 4 Basic Code template (New Project). The Cube sample is an adaptation from the DirectX sample code. We added all available features to show all parts of the Genvid integration.
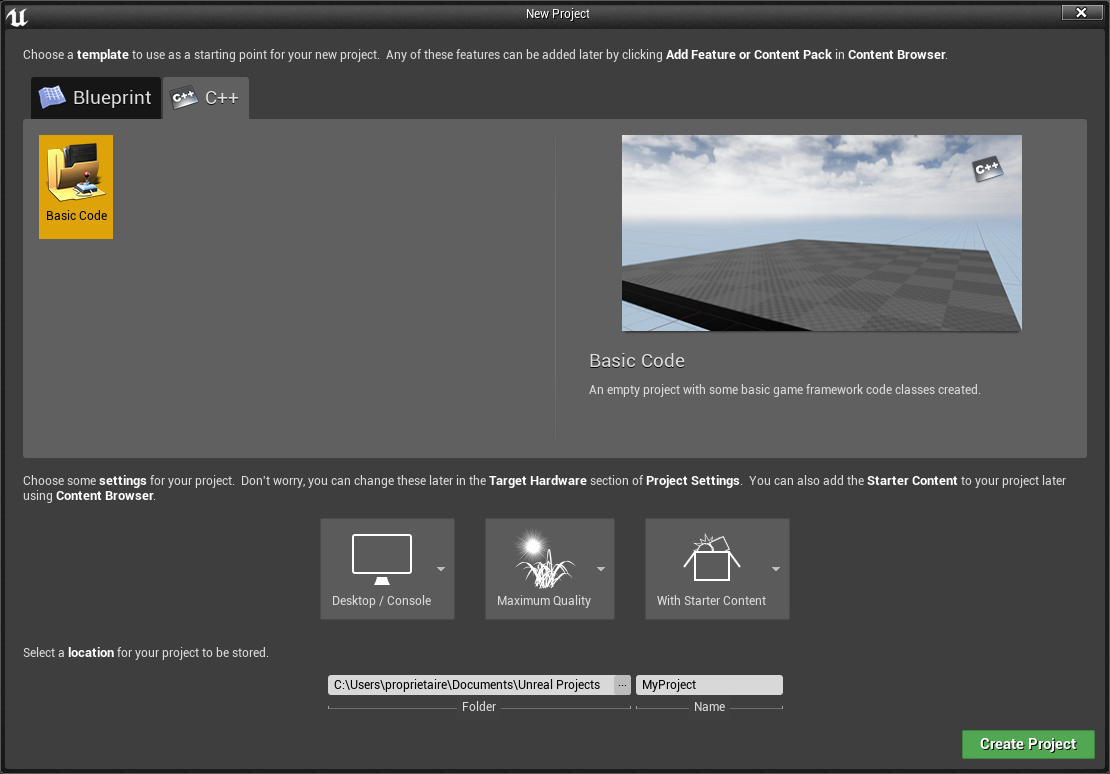
Fig. 65 New Project
Content
The Cube sample displays 3 cubes named Athos, Porthos, and Aramis. These cubes rotate and move in various fixed directions. Upon reaching the extremity of the world, a sound plays and the cube moves to the opposite side of the world to continue its movement without interruption.
C++ Classes
Cube.cpp: This file implements the game module.Cube.h: Header file of the game module.ActorCube.cpp: Actor class which contains the matrix-transformation functions for the cubes.ActorCube.h: Header file that declares the function to be callable in Blueprint.Game.cpp: Class derived fromUObjectwhich contains the view-projection matrix of the player.Game.h: Header file that declares the function to be callable in Blueprint.
Blueprint Game Classes
BP_Cube: Class used to show and manage a cube.BP_Pawn: Class used as the default pawn.BP_GameInstance: Class used to instantiate the Genvid Session Manager.BP_GameMode: Class used to setup the game classes.BP_GameState: Class used to receive Events and Commands from the client.BP_PlayerController: Class used to send Events and Commands to the server.
Blueprint Genvid Classes
BP_GenvidSessionManager: Class used to manage the Genvid session.BP_GenvidSession: Class used to set up the Genvid session.BP_GenvidAudio: Class used to set up the Genvid audio-parameters.BP_GenvidVideo: Class used to set up the Genvid video-parameters.BP_GenvidStreams: Class used to set up the Genvid events.BP_GenvidEvents: Class used to set up the Genvid events.BP_GenvidCommands: Class used to set up the Genvid commands.
Blueprint Structures
BP_CubeData: Structure used to store the cube data.BP_GameData: Structure used to store all cubes and the view-projection matrix.BP_NameToColor: Structure used to store a color and its name.BP_ColorChanged: Structure used to store a color and its name in string format for annotations.BP_Popularity: Structure used to store the popularity of a cube name.BP_PopularityData: Structure used to store all the cubes’ popularities.
Assets
- MainMap : The game level map.
- Colored_Steel : The material used by the cube.
- galvanized_steel : The texture used by the material of the cube.
- EdSplash.bmp : A splash screen used by the Unreal Editor.
- Splash.bmp : A splash screen used by the Cube sample.
How to Run the Cube Sample
This guide assumes that your system is already properly configured to run the Genvid DirectX sample and that you can run the Genvid services. For information on running the services, see Start a Local Cluster.
Declare an environment variable named
UE4ENGINEDIRthat points to the Engine directory of your version of Unreal Engine 4. By default, it usesUE4ROOT/Engine, whereUE4ROOTis the installation directory of Unreal Engine 4.Note
You can now specify the engine version you want to use.
If you use the
Epic Games Launcherthe python script automatically retrieves the path location of all installed versions of Unreal Engine.When you build the project (step 3), add the option
-vor--versionand the engine version-number at the end of the build command.For example, to build using Unreal Engine Version 4.19 use:
py ue4.py build -v 4.19If you aren’t using the game launcher, you can manually set the environment variable. To manually set it, declare the variable name in the format: UE4ENGINEDIR_{1}_{2} where:
- {1} is the major engine version, and
- {2} is the minor engine version.
Use the -e argument to indicate you’re using the manually assigned environment variables:
py ue4.py -e build -v 4.19Prepare the cube folder for building.
py ue4.py prepare
- This will copy the Genvid Plugin and Genvid Module under the
cube/appfolder.
Build the project.
py ue4.py build
This generates the Visual Studio solution for the project and immediately tries to build it.
Note
If you encounter any issues when building the package:
- Verify the uproject file is associated with Unreal
Engine. Use the program UnrealVersionSelector in the Unreal
Engine directory:
Engine\Binaries\Win64. - If you have updated your engine version, try deleting the
Intermediatedirectory in the Cube sample undersamples\cube\ue4\app.
- Verify the uproject file is associated with Unreal
Engine. Use the program UnrealVersionSelector in the Unreal
Engine directory:
Clean and load the project configuration.
genvid-sdk setup # Make sure the local cluster is created.
genvid-sdk clean-config # Clean old config in case of existing cluster.
genvid-sdk load-config-sdk # Configure the basic services for the SDK.
py ue4.py load # Configure the cube jobs and settings.
Go to the
/samples/cube/webdirectory.Build the website.
py web.py build
Load the website.
py web.py load
Start the project.
genvid-sdk start
Genvid integration
Create Genvid Blueprint Classes
There are seven classes that make it possible to integrate the Genvid MILE SDK in your application directly through the Unreal Editor:
To do that, you need to create a Blueprint for each class.
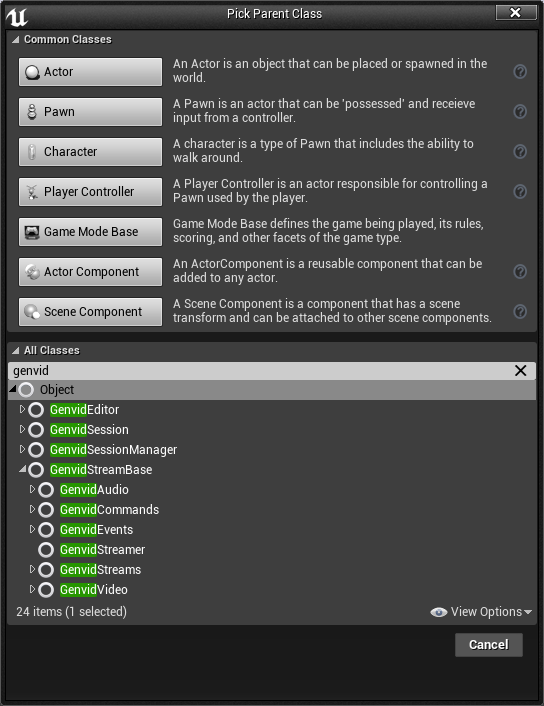
Fig. 66 Genvid Blueprints
Once finished, you should have the following in your Content Browser.
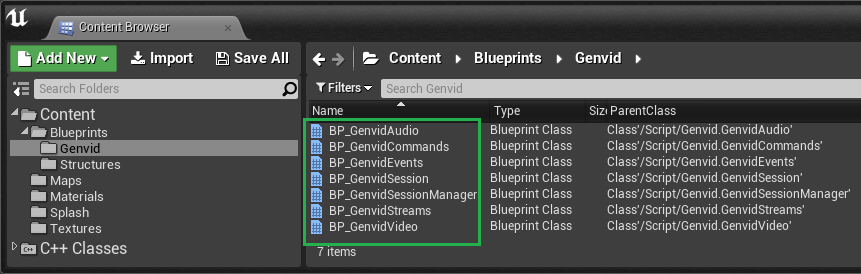
Fig. 67 Content Browser (Genvid Blueprints)
Set up Blueprints
Once you create all the necessary Blueprints, you need to set them up.
BP_GenvidSessionManager
The BP_GenvidSessionManager class is a Data-Only Blueprint. You use it
to select the Genvid Session.
In the Details tab:
- Select the
GenvidVideoBlueprint you created for the Session Class you want to use.- Set the game framerate you want to apply.
- Select the Activate SDK option.
Note
We designed the Genvid Module to potentially handle multiple sessions in the future. For now, a GenvidSessionManager instance may only contain a single GenvidSession based on the current Genvid MILE SDK design.

Fig. 68 Genvid Session Manager
BP_GenvidSession
The BP_GenvidSession class is a Data-Only Blueprint. You use it to select
the classes for the Video, Audio, Streams, Events, and Commands.
In the Details tab select the Blueprint you created for each class.
(For example, select the Blueprint you created from GenvidVideo for
Video Stream Class.)
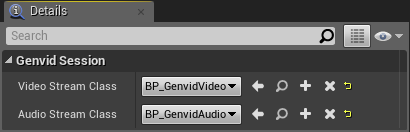
Fig. 69 Genvid Session
BP_GenvidVideo
The BP_GenvidVideo class is a Data-Only Blueprint. You use it to set the
parameters for a video stream:
- Stream Name: Unique name for the video stream.
- Framerate: Tells Genvid what the expected video-data frequency is.
- Video Mode: Video capture-mode. (
AutomaticorTexture)- Video Source: Video data-source. (Only if required by the Video Mode selected.)
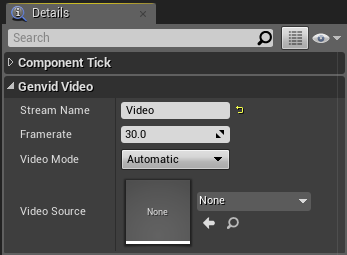
Fig. 70 Genvid Video
BP_GenvidAudio
The BP_GenvidAudio class is a Data-Only Blueprint. You use it to set the
parameters for a audio stream:
- Stream Name: Unique name for the audio stream.
- Audio Format: Audio data-format. (
GenvidAudioFormat_S16LEorGenvidAudioFormat_F32LE)- Audio Mode: Sound capture-mode.
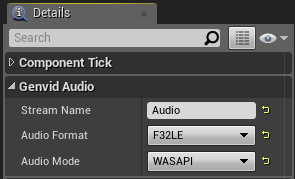
Fig. 71 Genvid Audio
BP_GenvidStreams
The BP_GenvidStreams class contains all required code to create and manage
all the streams.
Use the GenvidStream structure to create a stream. Type
Make GenvidStream in the All Possible Actions context menu to
add it to the Event Graph.
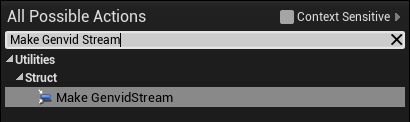
Fig. 72 Make GenvidStream (Genvid Streams)
Once you have added the node, you can set the stream parameters:
- Name: Unique name of the data stream.
- Framerate: Rate to send the stream.
- Stream (Tick): Event is called every frame. (Set by
Framerate.)- Stream (Begin Play): Event is called one time when the stream is created.
- Stream (Match Started): Event is called one time when the game starts.
- Stream (Match Ended): Event is called one time when the game ends.
- Stream (End Play): Event is called one time before the stream is destroyed.
Note
The Framerate property is only available for the event
Stream (Tick).
Set the Framerate property to 0 to call the event at each frame.
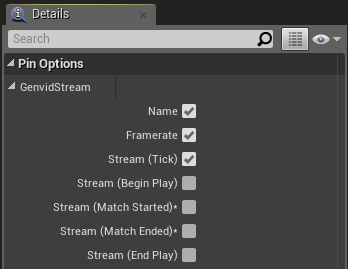
Fig. 73 GenvidStream Pin Options
For each stream event you select:
- Add a Custom Event. (Type
Custom Eventin the All Possible Actions context menu to add it to the Event Graph.)- Add a node to the function you want to call from your Custom Event.
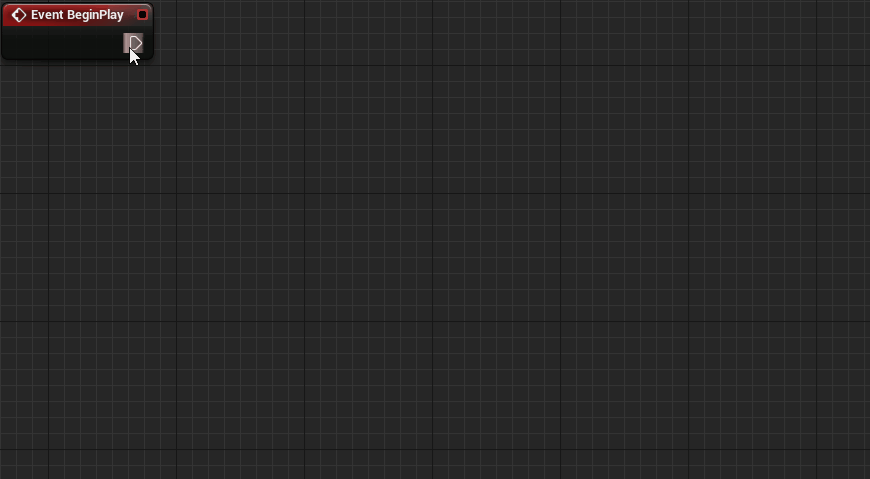
Fig. 74 Create Stream example
Caution
Stream Events are optional. If you select a stream event but you don’t link it to a custom event the Blueprint won’t compile. Either link it to a custom event or deselect it.
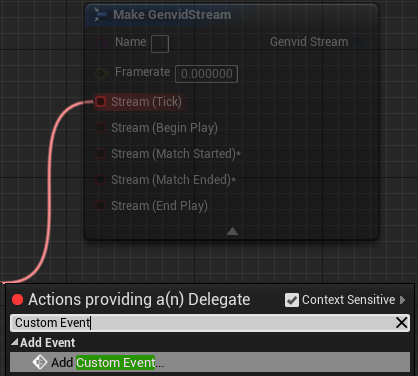
Fig. 75 Custom Event
After creating the Stream Event, add it to the Set Streams variable.
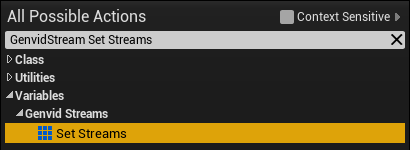
Fig. 76 Set Streams Variable
In this sample, we use the BP_GenvidStreams blueprint to create separate data
streams for the cube names, cube colors, cube positions, camera info, and game copyright.
Fig. 77 GameData Streams
Each stream is defined with its id, submission frequency, and delegate.
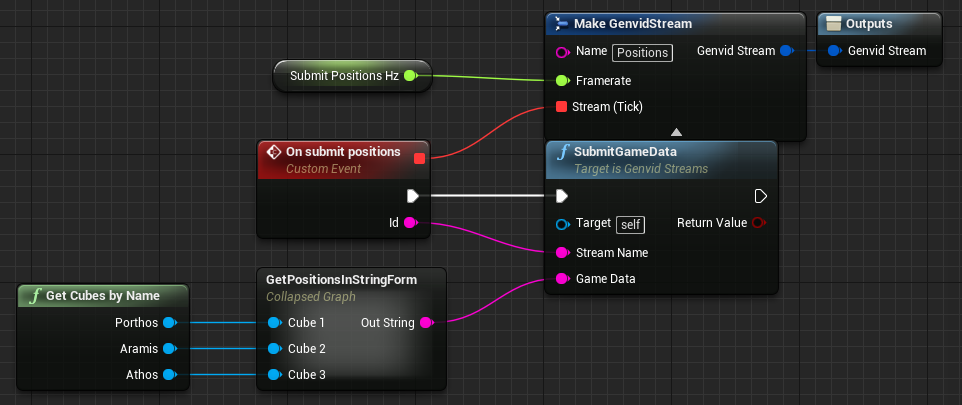
Fig. 78 Positions Stream
We recommend creating a data stream per data type to allow for better organisation and flexibility.
BP_GenvidEvents
The class BP_GenvidEvents contains the code required to create and
manage all Stream Events.
Use the GenvidEvent structure to create an
event subscription. Type Make GenvidEvent in the All
Possible Actions context menu to add it to the Event
Graph.
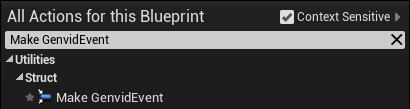
Fig. 79 Make GenvidEvent
Once you have added the node, you can set the event parameters:
- Name: Unique name for the data stream.
- Replicated: Call the delegate on client or server (Authoritative client/server networking model).
- Delegate: Event triggered when the Genvid MILE SDK receives an event.
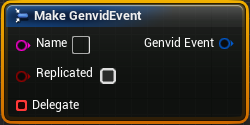
Fig. 80 Genvid Event Parameters
From the Delegate parameter:
- Add a Custom Event. (Type
Custom Eventin the All Possible Actions context menu to add it to the Event Graph.)- Select
Add Custom Event...to add a node with predefined parameters.
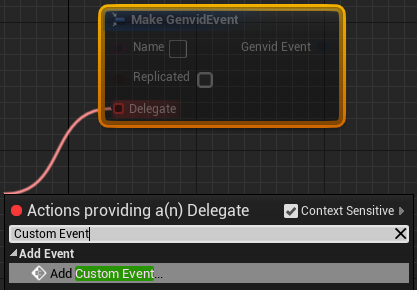
Fig. 81 Custom Event
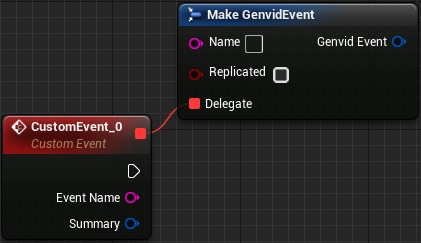
Fig. 82 Custom Event Node
Now add the new event to the Genvid Events variable.
- Type GenvidEvents Set Events in the All Possible Actions context menu.
- Select
Set Events.
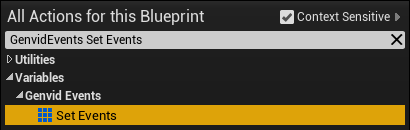
Fig. 83 Events Variable
The following images are examples of what fully-defined event Blueprints look like. Your own Blueprints will vary, depending on how you decide to arrange and manage events for your application.
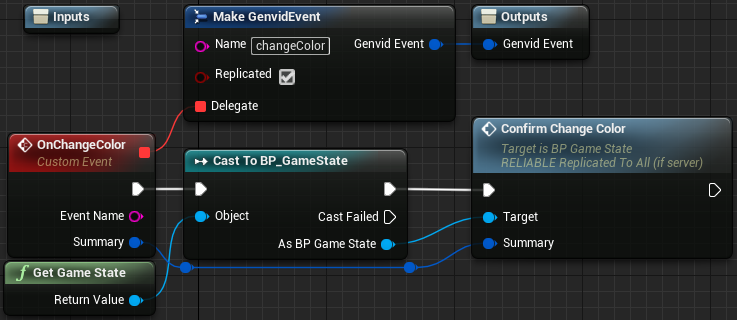
Fig. 84 Color Event
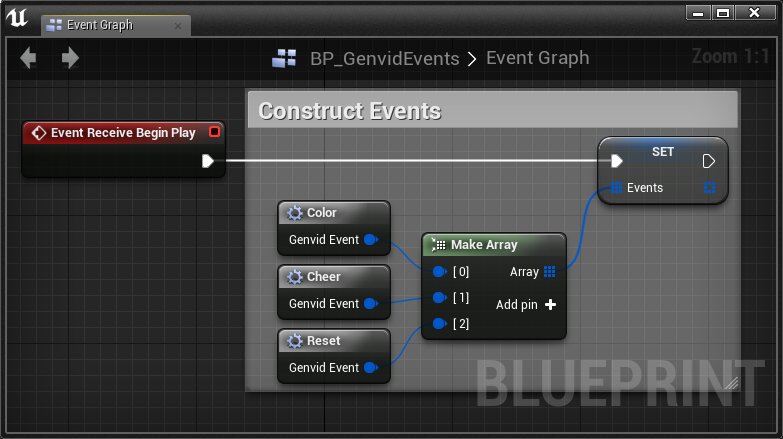
Fig. 85 Genvid Events Construction
BP_GenvidCommands
The BP_GenvidCommands class contains the code required to create and
manage commands.
Use the GenvidCommand structure to
create a new command subscription. Type Make GenvidCommand in the
All Possible Actions context menu to add it to the
Event Graph.
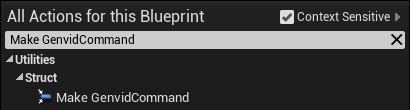
Fig. 86 Make GenvidCommand
Once you have added the node, you can set the command parameters:
- Name: Unique name for the command.
- Replicated: Call the delegate on client or server. (Authoritative client/server networking model.)
- Delegate: Command triggered when the Genvid MILE SDK receives a command.
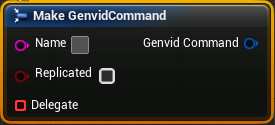
Fig. 87 Genvid Command Parameters
From the Delegate parameter:
- Add a Custom Event. (Type
Custom Eventin the All Possible Actions context menu to add it to the Event Graph.)- Select
Add Custom Event...to add a node with predefined parameters.
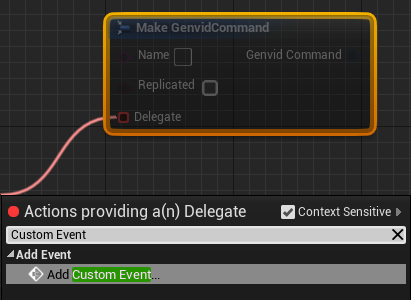
Fig. 88 Custom Command
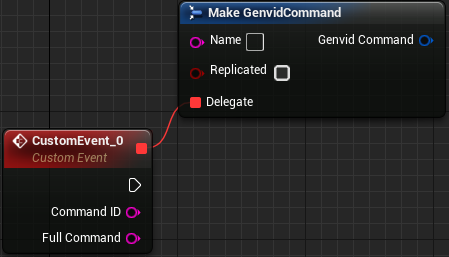
Fig. 89 Custom Command Node
Now add the new event to the Genvid Commands variable in
GenvidCommands.
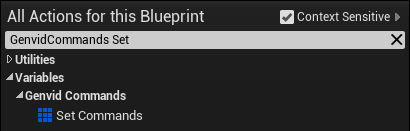
Fig. 90 Commands Variable
The following images are examples of what fully-defined command Blueprints look like. Your own Blueprints will vary, depending on how you decide to arrange and manage commands for your application.
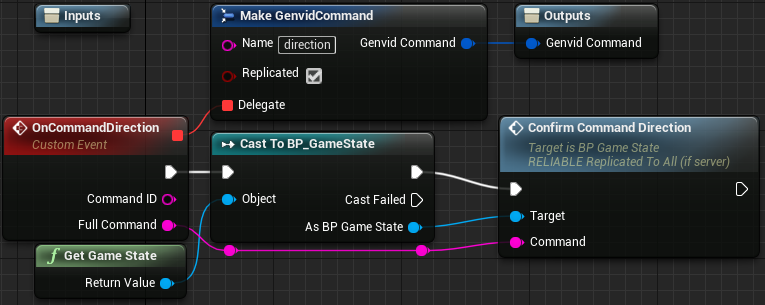
Fig. 91 Direction Command
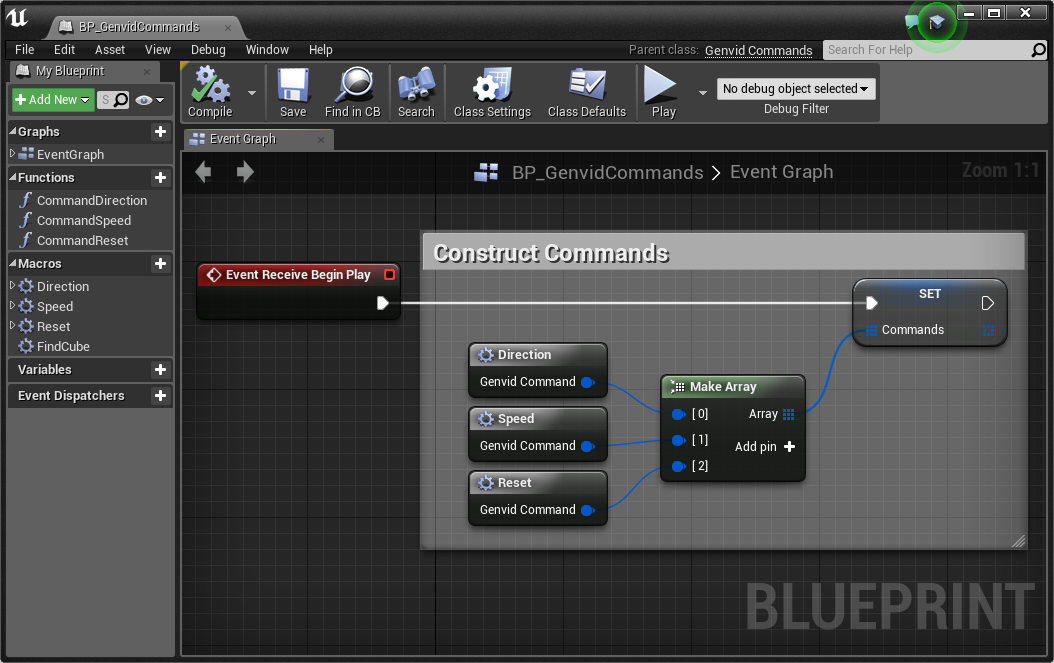
Fig. 92 Genvid Commands Construction
UE4 Cube Sample Blueprints
The Blueprint class BP_Cube contains all required Game code.
The Blueprint class BP_GameInstance contains all required code to
initialize and terminate a Genvid SessionManager.
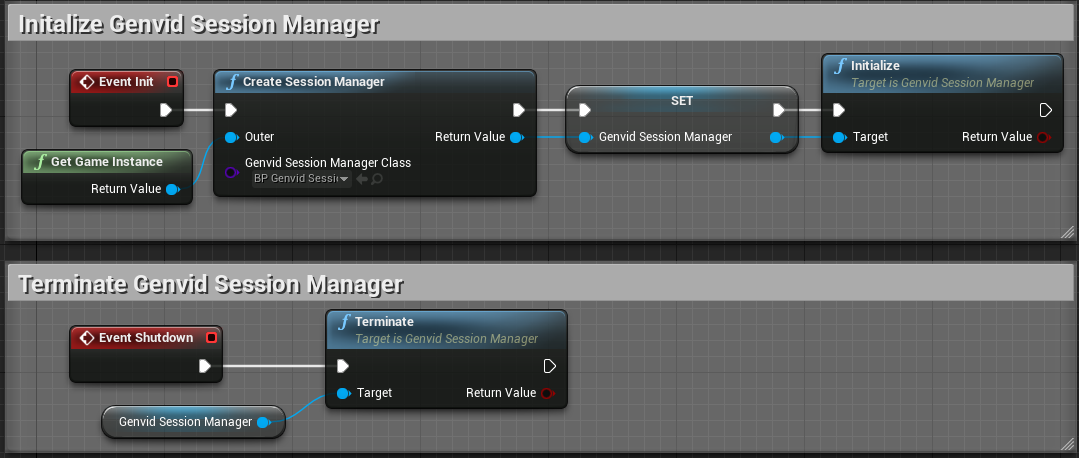
Fig. 93 GenvidSessionManager - Initialize/Terminate
It also contains all the code related to the Game Events and Game Commands.
- Events:
- ChangeColor
- Cheer
- Reset
- Commands:
- Direction
- Speed
- Reset
The Blueprint class BP_GameMode contains all the settings to use
customized classes for AGameState and APlayerState based classes.
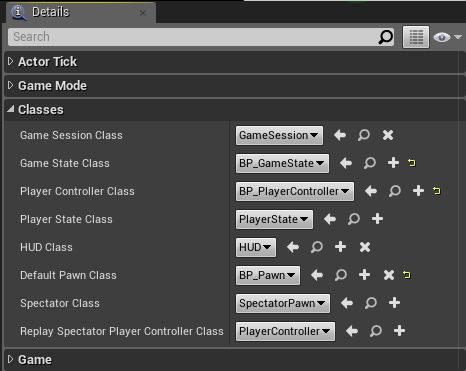
Fig. 94 GameMode
The Blueprint class BP_GameState contains all the required code to receive
the Genvid Events and Commands.
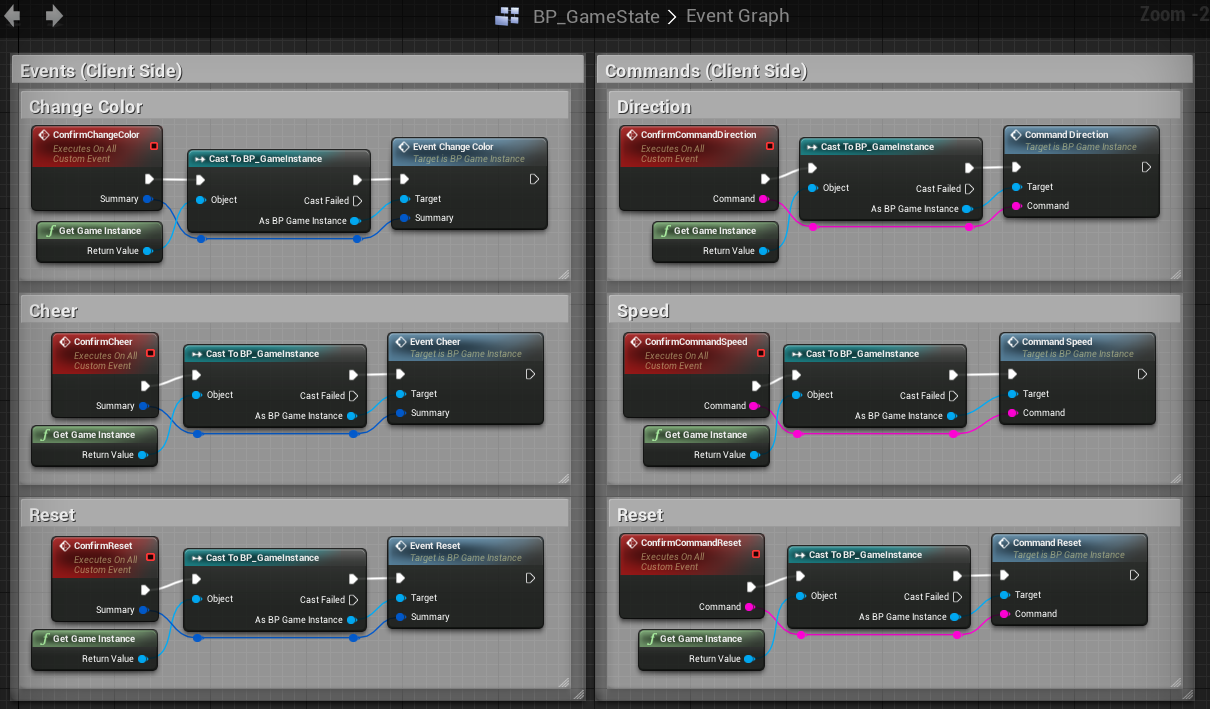
Fig. 95 GameState
The Blueprint class BP_PlayerController contains three components:
- BP_GenvidStreams
- BP_GenvidEvents
- BP_GenvidCommands
This is necessary to follow the Genvid MILE SDK Client/Server architecture. Take a look at Unreal Engine 4 Genvid Client/Server for more information.
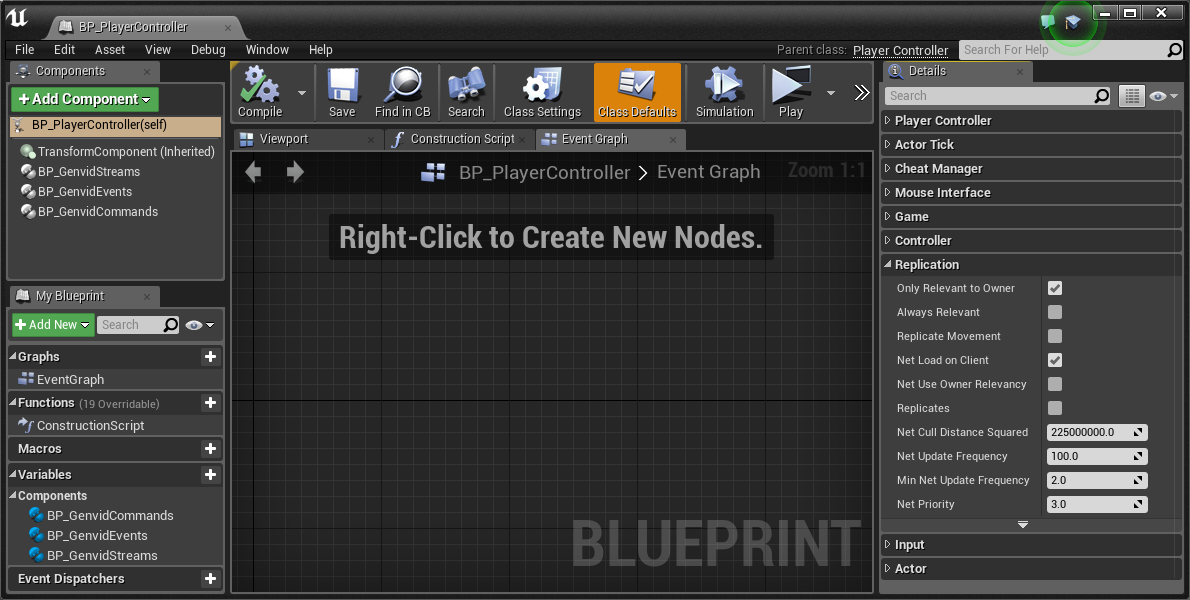
Fig. 96 PlayerController
Note
All data structures are automatically serialized in JSON when you submit game data to the server.
Instantiation
The Genvid Session automatically manages Audio/Video Capture initialization and finalization.
All Streams, Events, and Commands are Managed by the PlayerController.
A good place to instantiate the GenvidSessionManager is in a
UGameInstance-based class. Call the Initialize() function when the
application starts and Terminate() when the application stops.