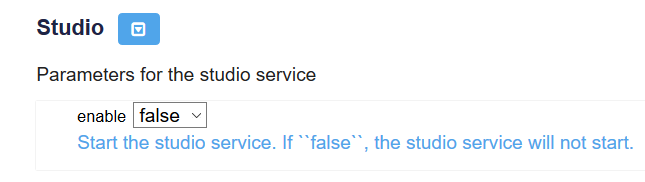
Genvid Studio service
Warning
The Genvid Studio and Composition feature is provided as a preview. The elements presented here will likely change in the future. The current version is only supported in Google Chrome.
The Studio service exposes the composition feature of the Genvid stack through a web interface. It can be used with either two instances of a game or with the Genvid Ingest sample. For this example, we use two instances of the DirectX Cube Sample Integration sample composed in different ways.
You can switch the output from one of the DirectX instances to the other, as well as create a PIP (picture-in-picture) composition. In PIP mode, you can select either of the cube samples as the inputs for the background picture or the PIP window. You can specify transitions between the two, as well as the window position.
Cluster configuration
Warning
Genvid Studio requires more resources from your clusters. You must augment the number of internal instances (here) to allow it to run. You can do it by incrementing the instance_internal_count setting by one.
Start a local cluster and set up the DirectX sample. By default, when loading the SDK configuration with genvid-sdk load-config-sdk, a link to the Studio UI Studio is being displayed but will remain deactivated until the studio service is running. After confirming that your cluster is working, stop the services and do the following:
- Go to Settings > Genvid Setting page to edit the neccessary system configuration.
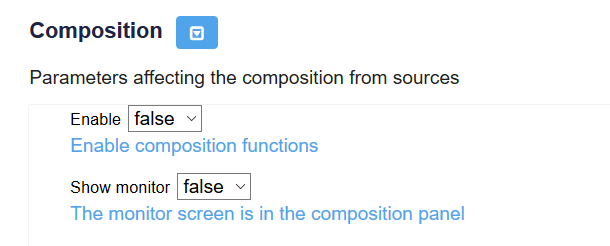
You will need to make sure that the studio service is enabled as well as the composition functions and the monitor.
You can also use your own HashiCorp configuration file that you can load with the following commands for a local cluster:
genvid-sdk load-config myhclfile.hcl
Or a cloud cluster:
genvid-sdk -c $mycluster load-config myhclfile.hcl
Here is an example of configuration for your own hcl file:
version = "1.7.0"

settings {
   services {
      studio {
         enable = true
      }
   }
   encode {
      composition {
         enabled = true
         has_monitor = true
      }
   }
}
You can now go back in Cluster UI and start streaming by clicking the Start All button.
Once the Studio link is enabled, you can click it to access the Studio page.
Important
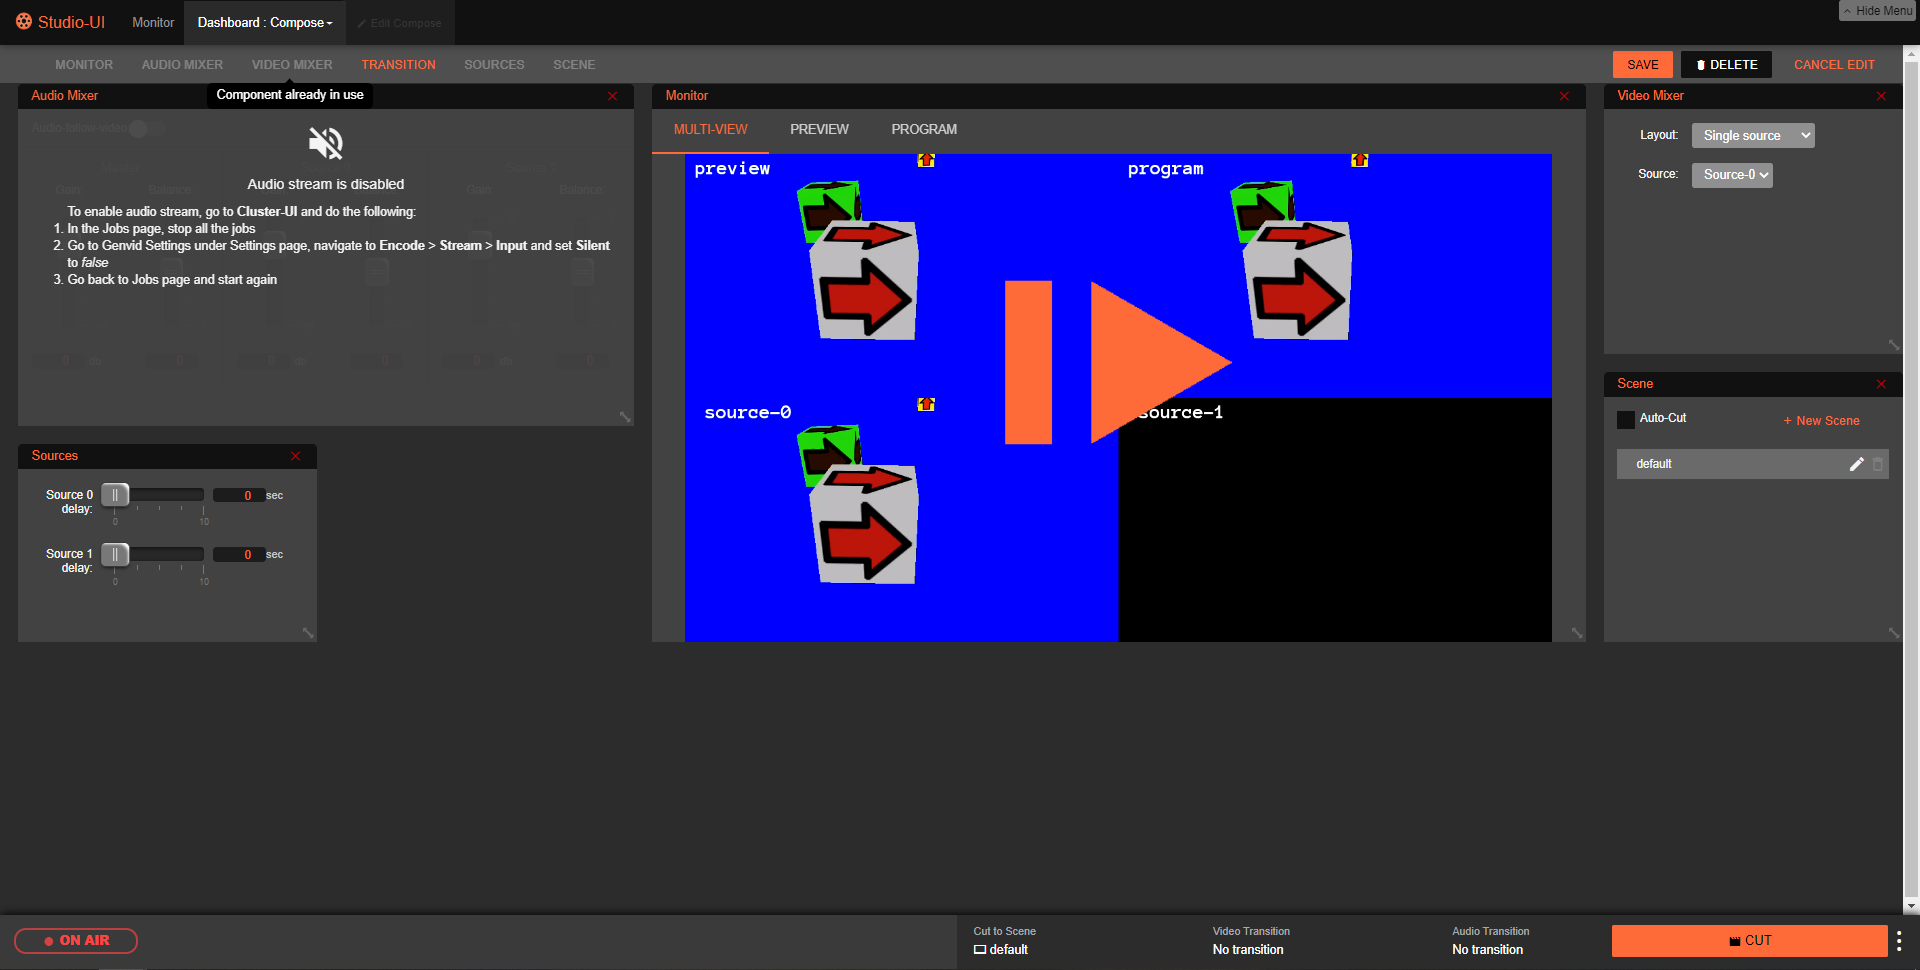
The audio stream is disabled by default. You can enable the audio stream
in Genvid Setting. Navigate to Encode > Input and set Silent field to false. Do so before starting the Studio.
The Studio website
Warning
This version of the Studio website only works on Google Chrome. It is only available as a preview and the interface will likely change in the future.
Important
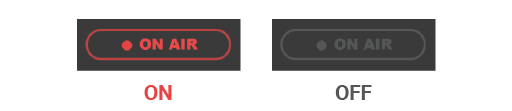
We added an ON AIR button to the Studio website in version
1.18.0. If your streaming service is configured something other than standalone,
the broadcast won’t start when:
- Genvid Setting
broadcast/enableis set to false, and - The ON AIR button is off.
If your streaming service is configured to standalone, the ON AIR button
will not affect the broadcast.
Starting a broadcast when streaming on YouTube or Twitch
To start a broadcast, click on the ON AIR button in the bottom left corner of Studio-UI. The broadcast will start some time later depending on the latency generated by the streaming service of your choice (e.g. YouTube or Twitch).
Note
The ON AIR button will not affect standalone streaming broadcast.
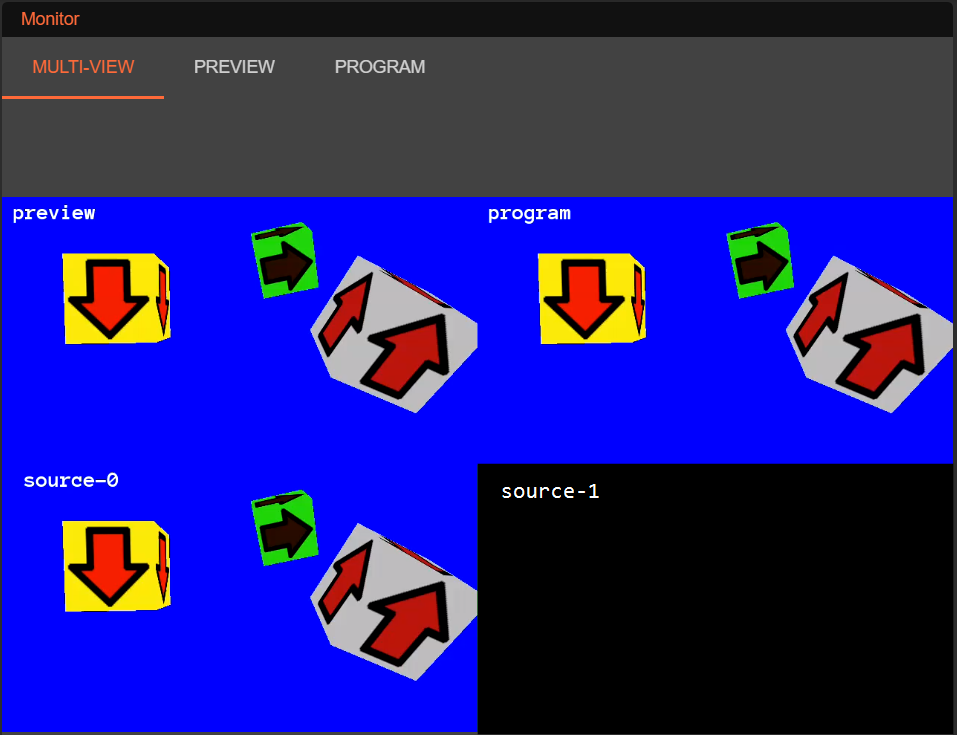
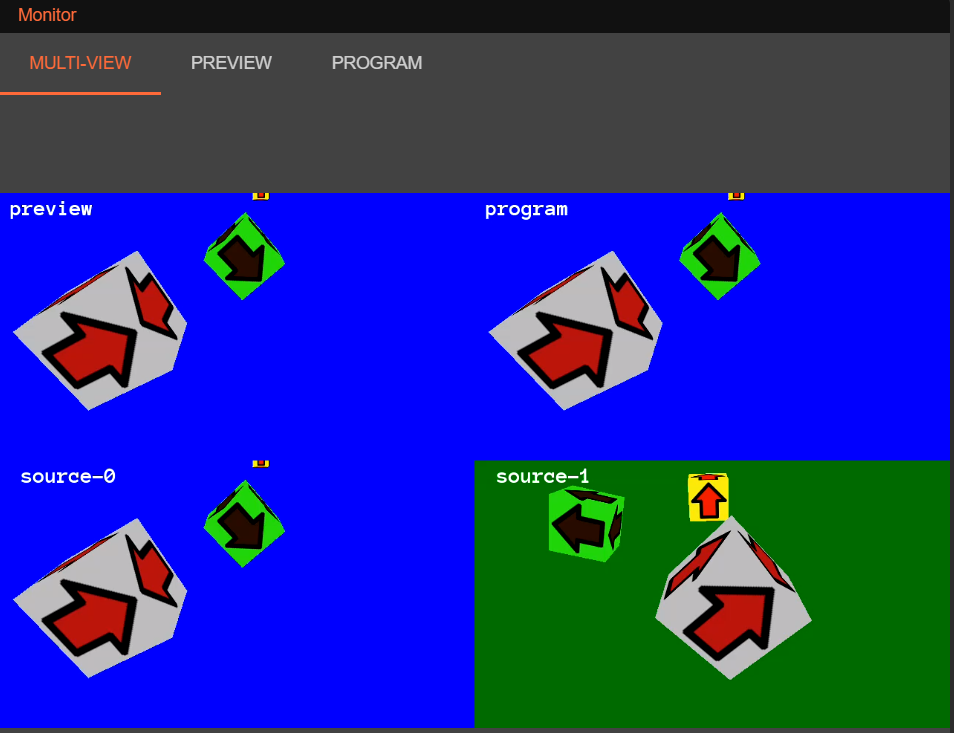
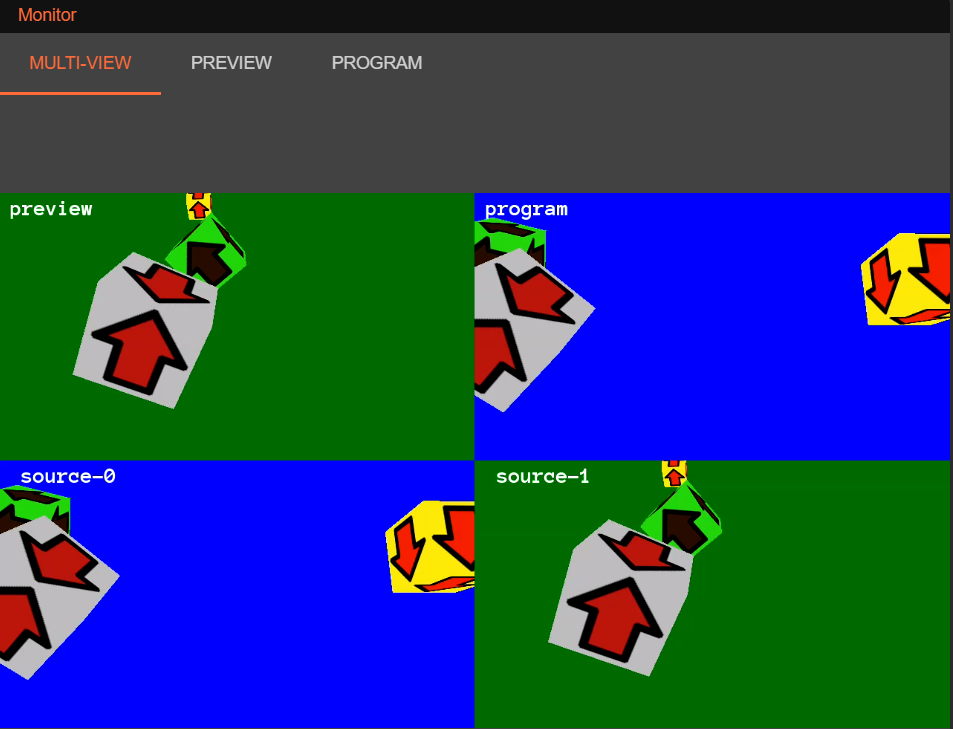
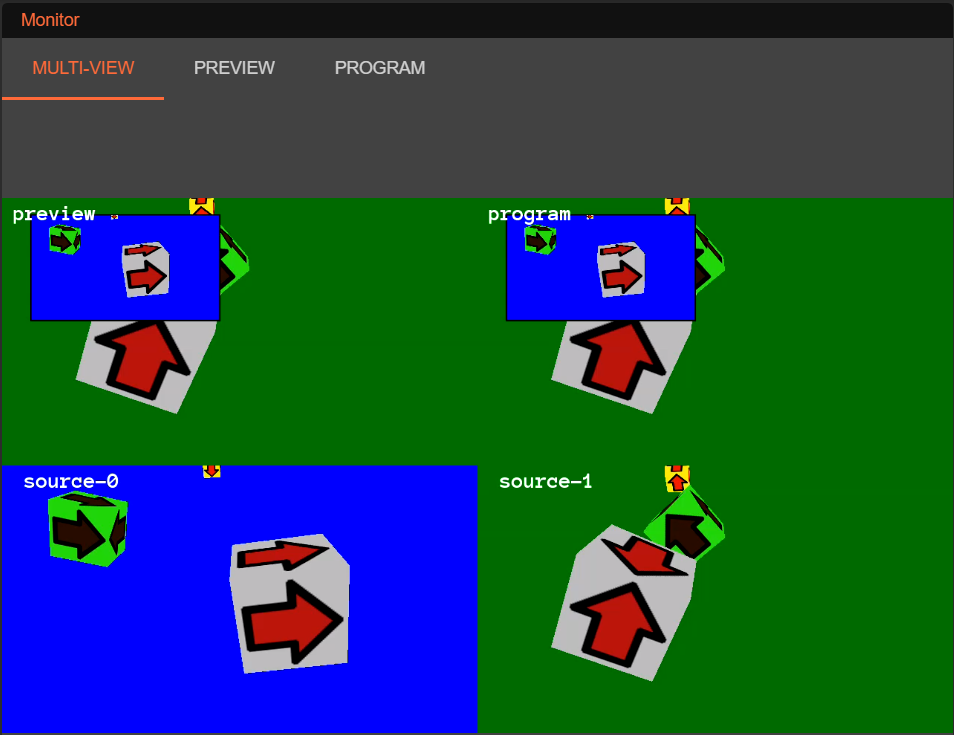
Monitor
The top of the Composition page is the monitor screen. It displays four different areas:
- The top left (preview) is the current Composition settings view.
- The top right (program) is the current broadcast output.
- The bottom left is the first input.
- The bottom right is the second input.
We only started one DirectX instance, so there is only one input active.
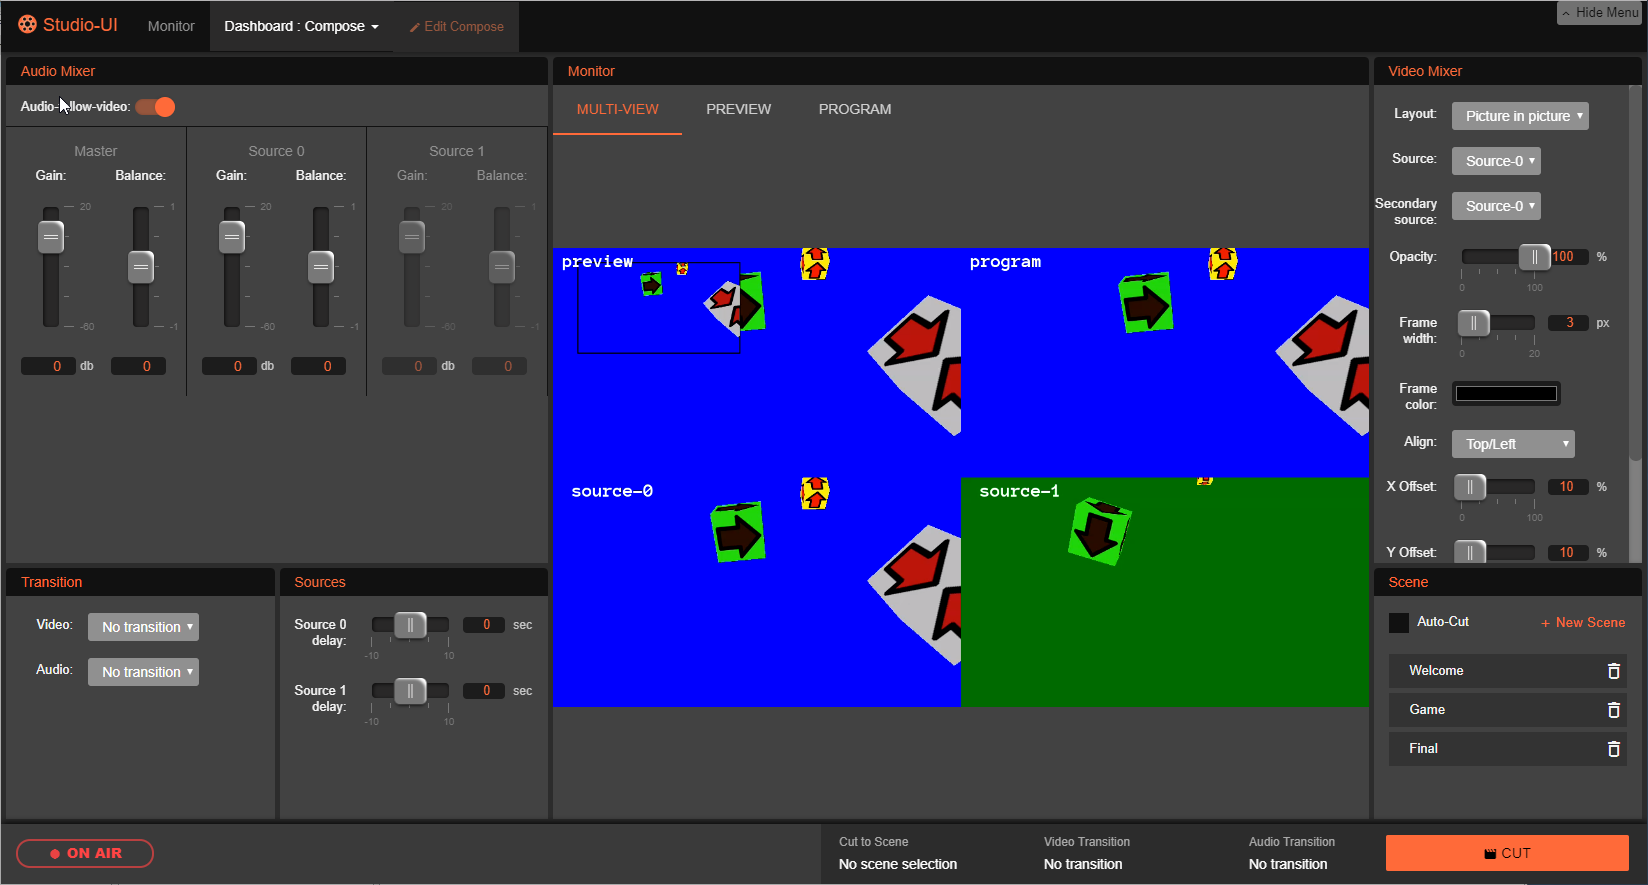
Composition editing
There are controls for modifying the composition. You can go to the individual page of a control, or use the dashboard to have all the controls at once.
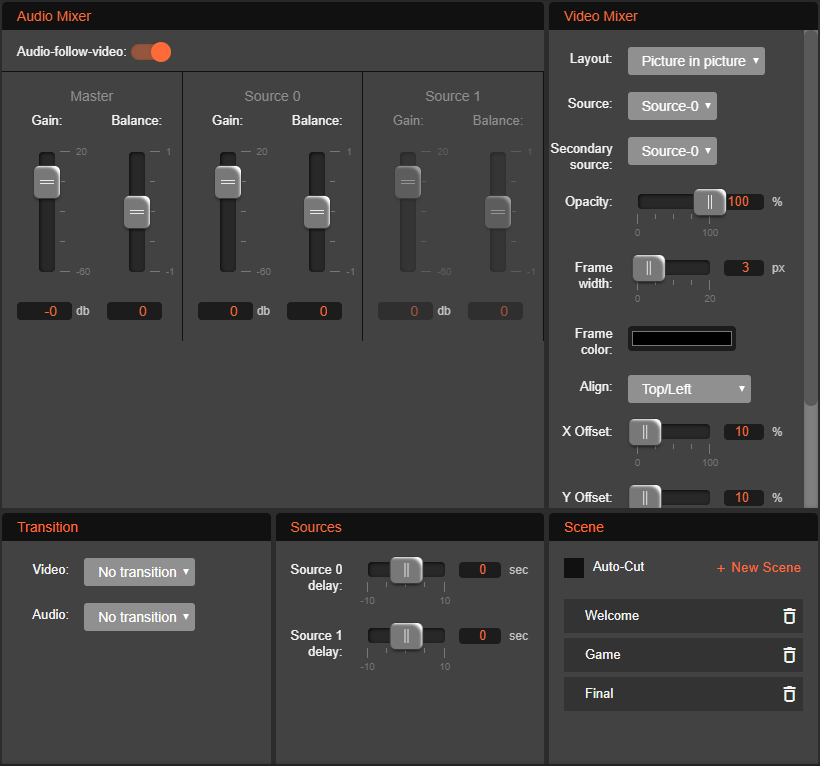
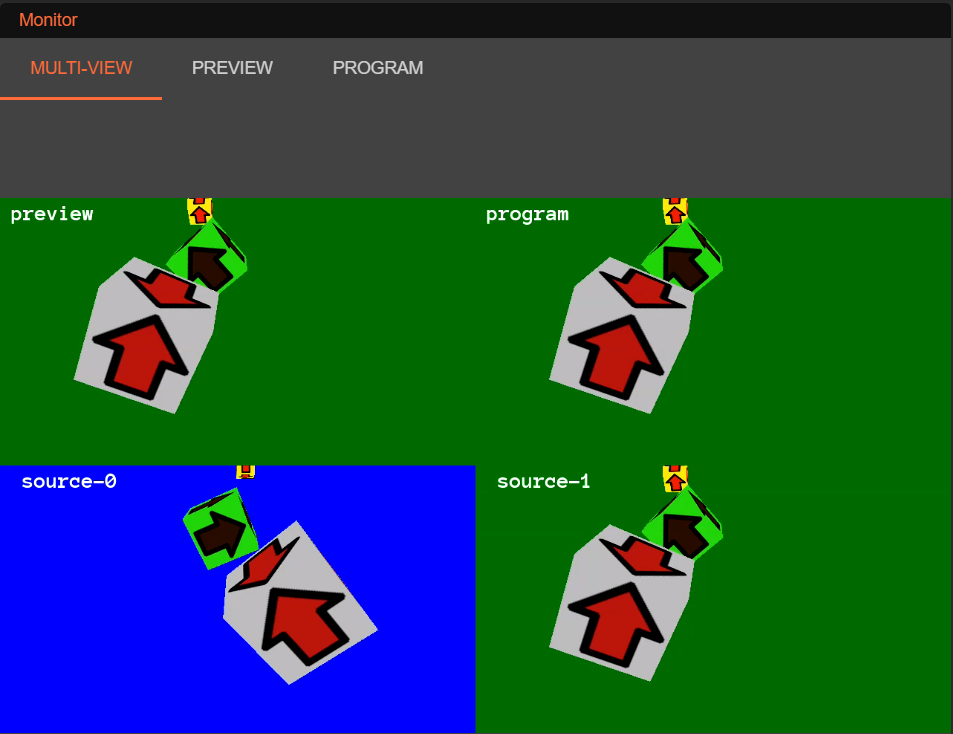
Example - How to switch video source
Click the green arrow next to “directx” on the Cluster-UI jobs page to start a second DirectX instance.
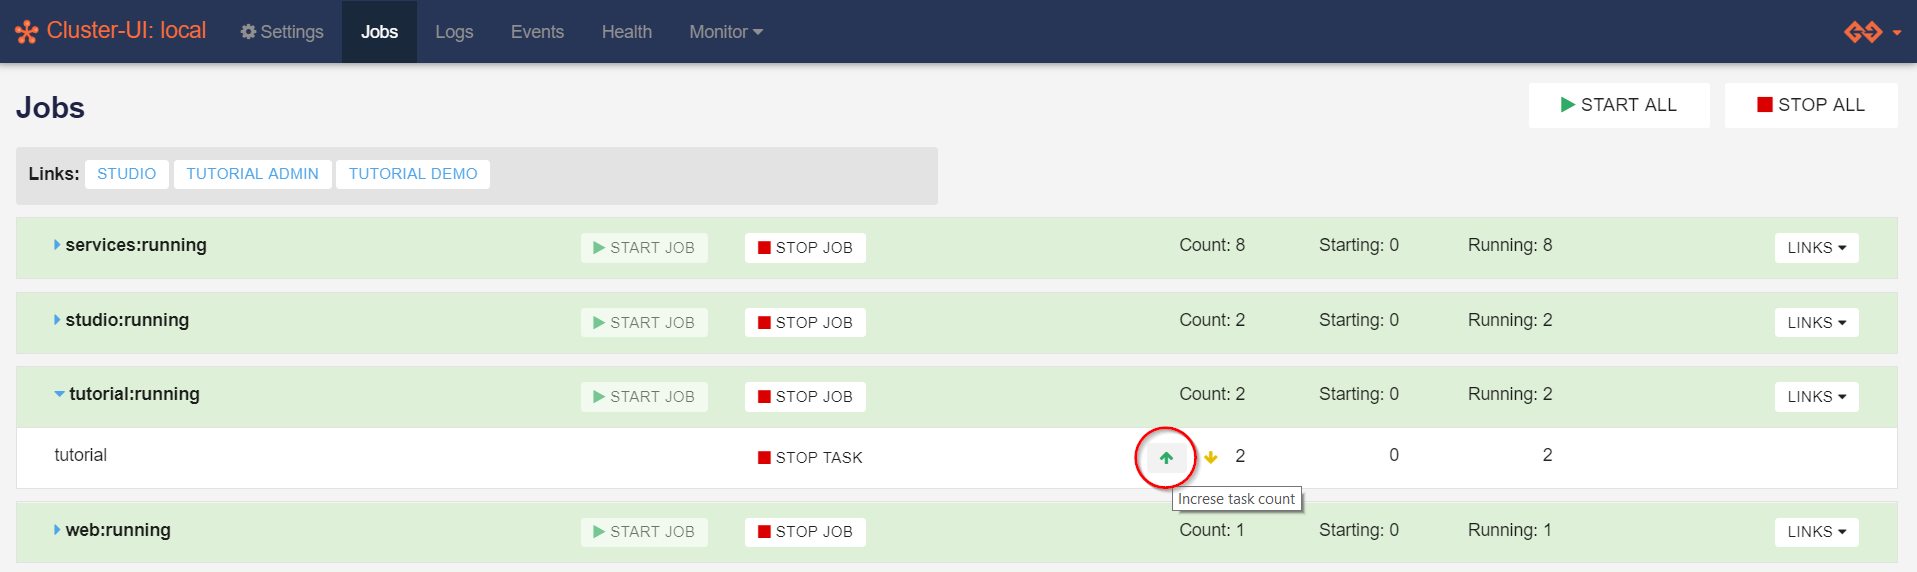
We now have two active inputs.
Select Source 1 as the active input in the Source of the Video Mixer.
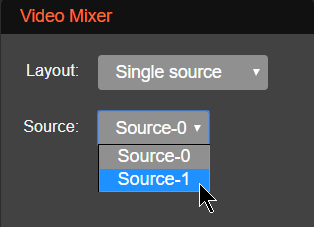
Source 1 shows in the preview area, while Source 0 still broadcasts.
Click Cut in the bottom right corner of Studio-UI to switch the streaming to Source 1.

Source 1 is now broadcasting.
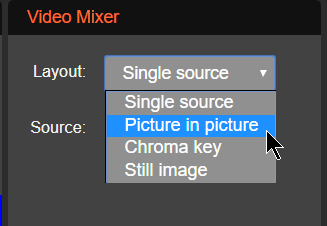
Example - How to activate PIP
Select Picture-in-Picture in the Layout dropdown list of the Video Mixer.
Source 0 now shows in the PIP window, while Source 1 is the background image.
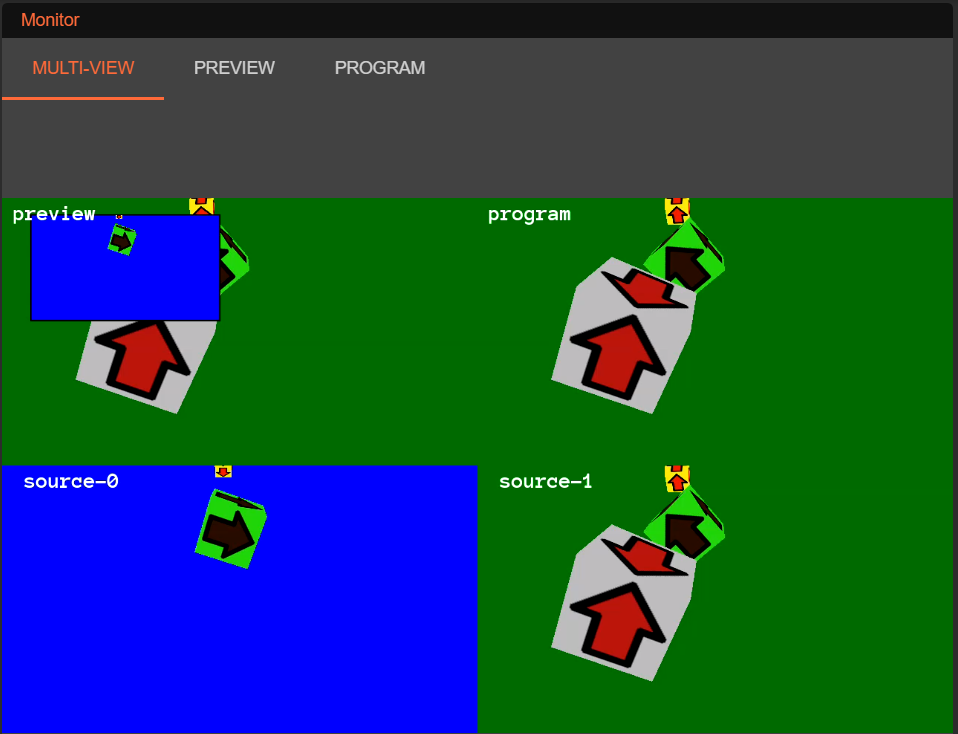
Click Cut in the Transition section of Compose to switch the streaming to
the PIP composition.
The PIP composition is now broadcasting.
You can now experiment with the other settings.
Dashboards
A dashboard is a customized layout of all control panels. You can create dashboard and modify them.
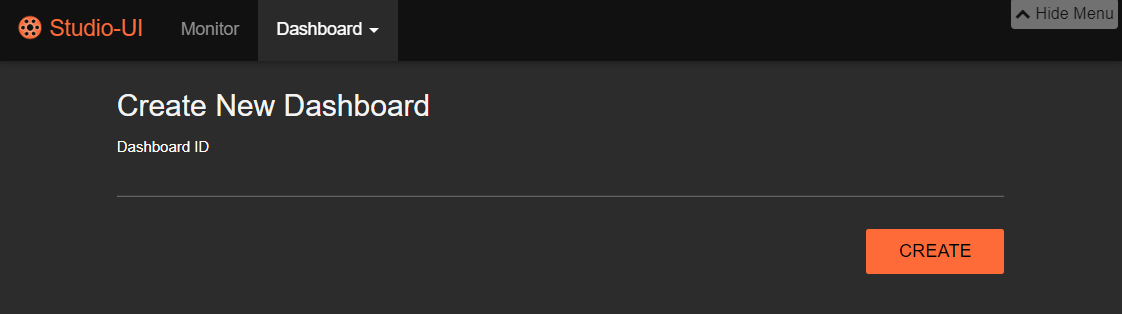
Create a Dashboard
To create a dashboard, go to the Dashboards menu and click New Dashboard. You will go to a page where you can create a dashboard. Enter an ID and click Create.
Edit a Dashboard
To edit a dashboard, click the Edit button on the navigation bar when the dashboard is active. You can add, remove, move or resize the control panels.
- Click the control panel name that you wish to activate.
- To remove a control panel, click the red X in the upper right window of the control panel.
- Menu items corresponding to control panels already on the dashboard are disabled.
- To save the the layout modification to the dashboard, click the Save button.
- To remove a dashboard, click the Delete button.
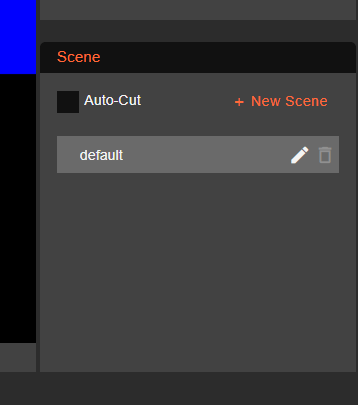
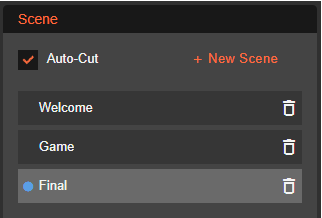
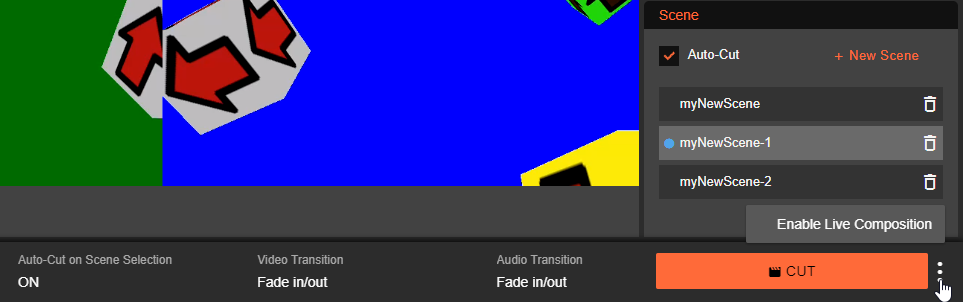
Scenes
A scene is the arrangement of a composition set for a specific purpose. You can create different scenes that have different compositions and switch between them.
Default scene
Studio automatically creates a scene with the default configuration when you open a new dashboard. You can click the Edit button to modify the name or composition arrangement. The Delete button is disabled whenever there is only one scene in the list.
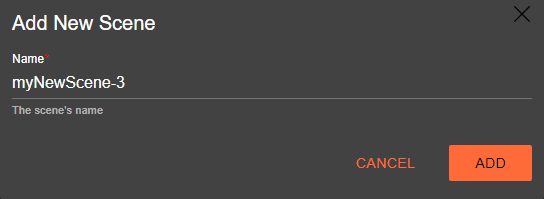
Create a scene
To create a new scene with the current composition arrangement:
- Click + New Scene on the Scene panel. This opens the Add New Scene dialog box.
- Enter a name for the scene.
- Click ADD.
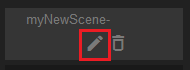
View/Edit a scene
To view or edit one of your scenes:
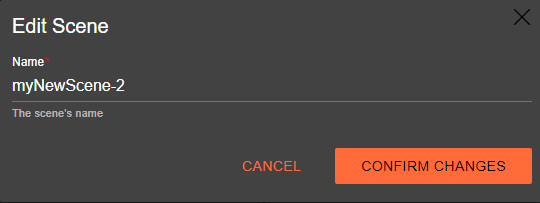
- Click on the crayon icon on the scene you want to edit. This opens the Edit Scene dialog box.
- If you wish so, you can modify the name of the scene. If a name is already taken, the CONFIRM CHANGES button will turn gray and you won’t be able to save it.
- Click CONFIRM CHANGES.
Duplicate a scene
To configure a new scene that’s based on an existing scene:
- Select the existing scene you want to duplicate.
- Click + New Scene on the Scene panel.
- Enter a different name for the scene.
- Click ADD.
This will duplicate the composition arrangement from the existing scene and you can then modify from there.
Modify a scene
To modify an existing scene:
- Select the scene you want to change.
- Change the control values as needed.
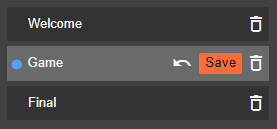
Changing the scene composition causes the Reset and Save buttons to appear. Click Save to save the changes or Reset to undo them.
Note
If the scene you’re modifying is the current broadcast stream (with a blue dot by its name), the changes won’t automatically be applied to the broadcast unless Auto-Cut is enabled. If it isn’t, click CUT to apply changes to the stream.
Delete a scene
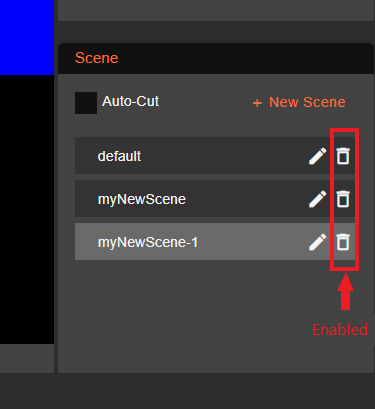
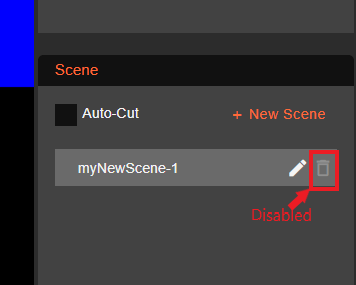
You can click the Delete button next to any scene to delete it. However, you must have at least one scene, so we disable the Delete button for the last remaining scene.
Switch between the Scenes
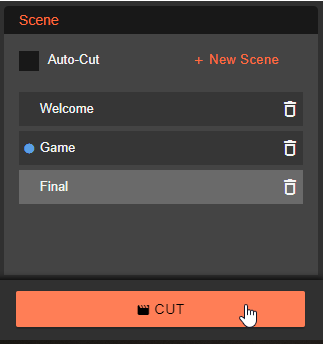
To switch to another scene:
- Select the scene you want to broadcast.
- Click CUT.
A blue dot appears next to the name of the scene, indicating that the current broadcast stream is using that scene.
Auto-Cut on Scene Selection
The Auto-Cut feature lets you immediately switch to a new scene or apply changes to the current broadcast stream.
If you select the Auto-Cut check box, the broadcast stream changes as soon as you select a different scene. When you make changes to the scene you’re currently broadcasting, the changes are applied as soon as you save them.
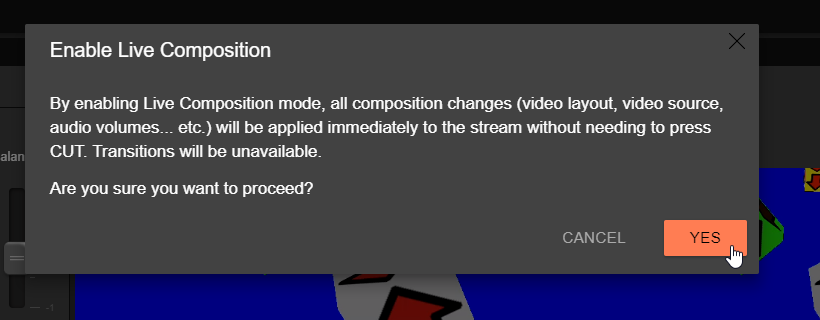
Live Composition
Live Composition mode is like setting Auto-Cut globally. It works beyond the scope of scenes and sends changes you make directly to the stream without a CUT.
Enabling Live Composition affects the studio dashboard in several ways:
- Only preset transitions will play when you switch between scenes. You can’t add or change transitions for a scene.
- It enables the Auto-Cut feature and disables the check box. You can’t turn it off directly.
- The Status panel shows Live Composition Mode: Enabled and adds a Disable button.

Enable Live Composition
To enable Live Composition mode:
Click the three-dot button beside the CUT button.
A warning dialogue appears which explains what Live Composition mode does.
Click YES to enable Live Composition.
Disable Live Composition
To disable Live Composition mode, click Disable in the Status panel.